Free organic fertilizer for your garden
The idea of growing your own organic food at home has really taken root in recent years. If you are one of those who has sprouted a green thumb (or if you would like to give it a try) then why not complete the environmental loop by making your own organic fertilisers from various ‘waste’ materials that are generated around the home. It requires surprisingly little effort and, not only does it help the environment, it also saves money in fertiliser and potting mix costs. It can also be done effectively in very small spaces, so even if you are a high density dweller, it is still very practical to make your own fertiliser.
Another powerful reason to make your own organic fertilisers is that it is a way of making a difference to greenhouse gas emissions at a personal level. Organic materials make up a very significant amount of the waste stream that goes to landfill, with the subsequent decomposition process proceeding in the absence of oxygen (anaerobic conditions). This, in turn, results in the release of carbon-rich methane, a greenhouse gas far worse than carbon dioxide in promoting the greenhouse effect that causes global warming. However, when composted at home and turned into fertiliser, the carbon that would have been emitted back into the atmosphere as methane ends up instead as part of the soil.
There are a number of options as to the type of organic fertiliser you can create. Liquid organic fertilisers give an instant boost to your plants as the dissolved nutrients are immediately available to the plant which is particularly important for very fast growing vegetables such as tomatoes and lettuce. On the other hand solid fertilisers such as worm castings give you a longer term fertiliser in that the nutrients gradually dissolve over a period of weeks with the added benefit that what remains is pure organic humus that acts like a sponge to boost the water and nutrient holding capacity of garden soils and potting mixes. There is a place for both types in a sustainable garden.
Liquid organic fertilisers
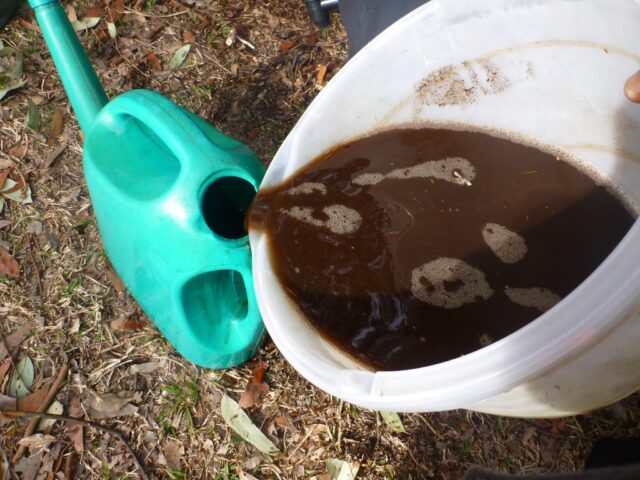
• Worm juice. Worm farms are organic fertiliser factories. As the worms chew through your kitchen scraps and other organic materials such as cardboard and shredded paper, they release nutrients that are bound up in the complex organic molecules they are feeding upon. The end result is that they excrete castings (manure) that is a well balanced source of plant nutrition that also adds valuable traces of humus to your soil or potting mix as well. Every time water flows through these worm castings a significant amount of nutrients become dissolved in that water and it is this process that can be harnessed to generate your free fertiliser. Collecting the liquid that accumulates naturally from your worm farm works quite well, however, it must be stressed that this liquid is generally very concentrated and should be diluted to a light brown colour (about the colour of a weak cup of tea). A second way to make your worm liquid fertiliser is to use a watering can to run about 10 litres of water through your worm farm. Putting a relatively large volume of water through at one time dilutes the fertiliser strength of the liquid down to something that is ready to use without further dilution. This process can be done every week if necessary. Watch my video for a visual guide – Harvesting castings from your worm farm
• Liquid manure. If you have a chook house or some other free source of manure then fill an old pillow slip or Hessian bag with manure and plunge it into a bucket of water and allow it to soak for a few days. The nutrients from the decomposing manure will leach from the bag into the water and the resulting brew may need to be diluted down to the consistency of a weak tea before you apply it to your plants through a watering can.
• Bokashi composting. This is an interesting form of composting invented in Japan that is particularly applicable to apartment dwellers. An airtight bucket with a snap on lid is filled with your kitchen scraps which are then sprinkled with a bran preparation that contains specific micro-organisms that begin the decomposition process within the bucket. These special microbes have evolved to grow and thrive in conditions where there is very little oxygen, hence the airtight bucket that also conveniently shuts out pests such as mice and cockroaches. At the base of the bucket there is a compartment with a tap to collect the liquid that results from the decomposition process. This liquid is diluted with 10 parts of water to each part of Bokashi liquid. The solid residue left in the bucket when it is full can be buried in the garden, compost heap or worm farm where it breaks down very quickly to humus.
Solid fertiliser
• Worm castings. Whilst the liquid from a worm farm is a great fertiliser for giving your plants an instant boost, the solids or ‘castings’ left at the end of the breakdown process are great as a soil conditioner as well as being fantastic fertiliser. When the organic materials in your worm farm look like the consistency of soil they are ready to use – it is as simple as that! By putting the castings in a pile the worms will burrow away from the light and you can scrape off the top layer of castings. Repat this process until you are left with a small pile of castings with heaps of worms in it. The ‘scrapings’ in your other pile are more or less worm free and can be sprinkled over your garden soil or mixed with potting mix at a ratio of about 1 part castings to 5 to 10 parts soil or potting mix.
• Burying your kitchen scraps. Dig a shallow hole or trench and put your kitchen scraps straight into the soil. The natural population of earthworms in your soil will find it and breed up accordingly to do the composting and after a few weeks that area will be ready for planting into (herbs and vegetables are particularly good choices for what will now be nutrient rich soil). You will often notice seedlings coming up after a few weeks in the area you have buried the scraps in. Plants such as tomatoes, watermelon, and pumpkin will germinate and grow quite happily in such a circumstance. If the time of year is appropriate for these plants then there is no reason why they can’t be left to grow on. However, if the timing is wrong or you don’t want them in that part of the garden, simply dig them in or pull up the seedlings and put them in your compost bin.
The bottom line is that with a small investment of time and effort there are several simple DIY ways to turn your kitchen scraps and other common household organic materials into rich fertilisers that are a well balanced source of nutrition for your plants as well as adding priceless humus that builds up the health of your soil with beneficial microbes. And a healthy soil always leads to healthier plants!
For more articles –
Getting started with worm farms
Compost to reduce soil borne root diseases
For lots of information on home growing vegies, worm farming composting and much more, check out the book
“Grow Your Own- How To Be An Urban Farmer””


